ANDROID: Browsing Realm Database On Windows.
I recently started using Realm as my mobile database and it has proved to be a very good solution as it is easy to implement and also it is live, so updating the User Interface to reflect changes in the underlying database is very easy.
But as with every other database, you often need to view its content without using the view from your application directly, Realm provides a solution for that through the Realm Browser. With the realm browser you can view and even edit the data from your realm database. The only problem is that realm browser is only available for MAC and UBUNTU operating systems but unfortunately its not available for WINDOWS.
So how would windows users monitor the content of their Realm database? That would be covered in this brief tutorial.
To achieve this we would use a tool called Stetho, developed by Facebook, Stetho give developers access to the Dev tools feature of the Chrome browser, so we would view the content of our realm database using Chrome browser. But another problem is that Realm db is not supported in Stetho by default, so we would make use of another library, stetho realm this would provide us the ability to view our realm db from the chrome dev tools using stetho.
We would complete the tutorials in the following steps
- Install dependencies.
- Ensure Stetho is only used from debug build only(We dont want to mess up our release apk).
- Use Chrome browser Dev tools to view our realm database. Pretty straight forward.
Note: This article assumes you have an app that utilizes realm db already, if you don’t then you can use one of the sample application’s from the realm db repository.
1. Install Dependencies. The dependencies required are shown below
in our Project level build.gradle file we add the the following maven url
allprojects {
 repositories {
  jcenter()
  maven {
  url: 'https://github.com/uPhyca/stetho-realm/raw/master/maven-repo' }
  }
}
then in our app level build.gradle file we add the following dependencies
    compile 'com.facebook.stetho:stetho:1.5.0'
    compile 'com.uphyca:stetho_realm:2.1.0'
2. Ensure Stetho is only used from debug build only
It is advised that Stetho be used only for debug builds only as you do not want it to be mumbled in your release project since you might not want users to monitor your database, to achieve this we configure stetho in the Application class that would only be used for debug build using , so we create a separate source set from the app/src/main folder, call this new folder **debug **app/src/debug where we would house our application class that would be used instead of our usual application class where we initialized realm.
our project structure would look like this:
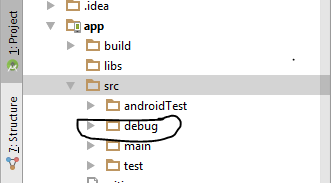
notice the debug folder, this folder would contain another Application class and and Android manifest file (all the android manifest files would be merged into one by gradle during build ).
In our newly created debug directory we add the new Application class we would call it DebugApplication.java
// this package should be the same with the main application class
package com.example.myapp;
import android.app.Application;
import com.facebook.stetho.Stetho;
import com.uphyca.stetho_realm.RealmInspectorModulesProvider;
public class DebugApplication extends Application {

 @Override
 public void onCreate() { super.onCreate();
 Realm.init(this);

 Stetho.initialize(
 Stetho.newInitializerBuilder(this)
  .enableDumpapp(Stetho.defaultDumperPluginsProvider(this))
  .enableWebKitInspector(RealmInspectorModulesProvider
  .builder(this).build()).build());
 }...
this Application class must belong to the same package as the main Application class, so that it can replace the main Application class correctly in debug mode. All this class does is to initialize Realm and Stetho.
Then we add Android manifest xml file to the build folder
this should be the content of the file:
<?xml version="1.0" encoding="utf-8"?>
<manifest
 package="com.example.myapp"
 xmlns:android="http://schemas.android.com/apk/res/android"
 xmlns:tools="http://schemas.android.com/tools">

 <application
 tools:replace="android:name"
 android:name=".DebugApplication"/>
</manifest>
With just these few settings, we are good to go! we can use the Chrome Dev tools to monitor our application and view our Realm database.
- Use Chrome browser Dev tools to view our realm database.
Before we use the chrome dev tools we have to sign into google chrome with a google account. We can do that by clicking on options → settings → sign in. To View our realm database, first we build and launch the application from android studio using Usb debugging, then when the application is running we can go to the url: chrome://inspect/#devices access the current connected device.
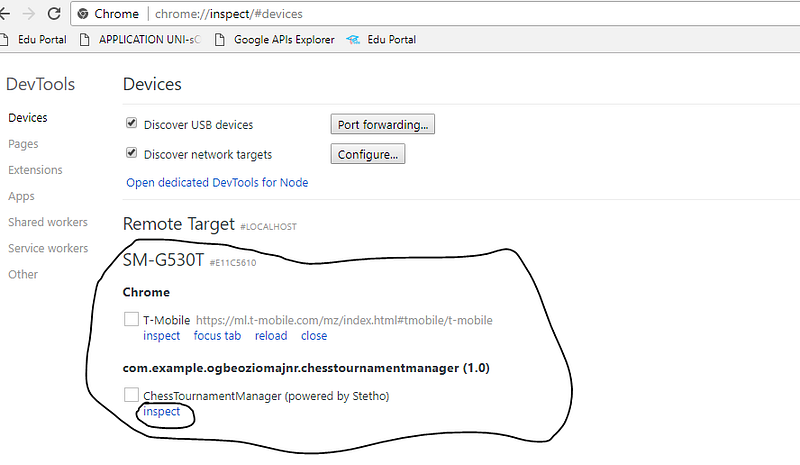
Chrome Dev Tools(inspect devices)from the screen shot you can see the device currently connected and the running apps that have stetho installed.
To view our realm db data, click on inspect from the app section. This would open a new chrome instance shown below:
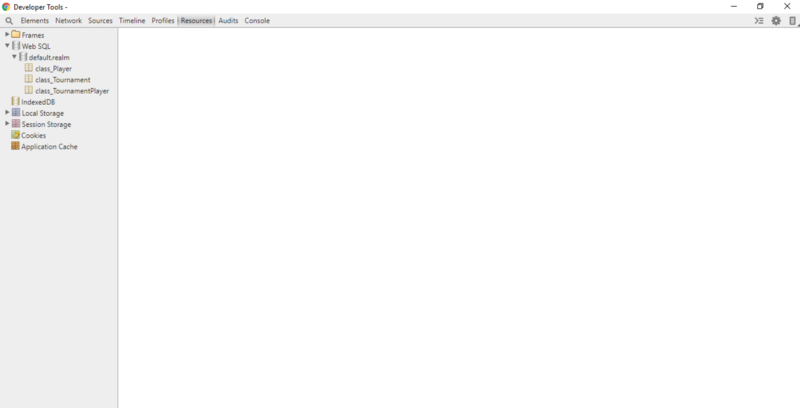
Navigate to the resources tab, then from the side bar, open the Web Sql node, then click on the name of your realm database and you can easily browse your realm object from there!

If you found this article helpful please support it with as many claps as you can, I would also welcome comments.