Consuming REST API in Xamarin.Android using REFIT
While developing an android application using java, I had to get data from an API endpoint and I discovered a library that made the job very easy for me. That library is RETROFIT, it allows you define your api endpoints as interface and then you can call the methods you defined conveniently and retrofit would provide an implementation of the interface you declared through dependency injection. Thus you do not have to worry about loading the data from the endpoints and handling asynchronous tasks. I wondered if I could do the same with Xamarin.android so I searched if retrofit has an implementation for xamarin.android, they didn’t but I found an alternative library that takes a similar approach to solving the problem of making api calls and that library is REFIT(the name tells its all).
In this tutorial we would learn how to make api calls using refit, we would be getting a list of developers in a location from github, I have decided to list developers in Lagos, Nigeria where I live, you can decide to add your own city! The result of our search would be displayed on a List View.
Refit would help us get the JSON response from the endpoint but to convert or deserialize the JSON response to a C# object, we would use JSON.NET.
We would follow the following steps to complete this tutorial
-
Start a new Xamarin.Android project using visual studio(I am using visual studio 2017 but the procedure would work for any version of visual studio)
-
Add reference to the refit library by getting it from nugget. Refit comes with Json.net so we would not have to install it separately.
-
Define the response model.
-
Define the user model(The user model represents a developer).
-
Define the api interface using refit.
-
Design the user interface.
-
Define refit Serialization settings(these settings are global and have to be set once throughout the application).
-
Make calls to the github api to get the list of developers.
-
Display the list of developers in a list view.
Lets get started.
1. Start a new Xamarin.android Project
From visual studio start a new Xamarin.Android project, select a blank project template.
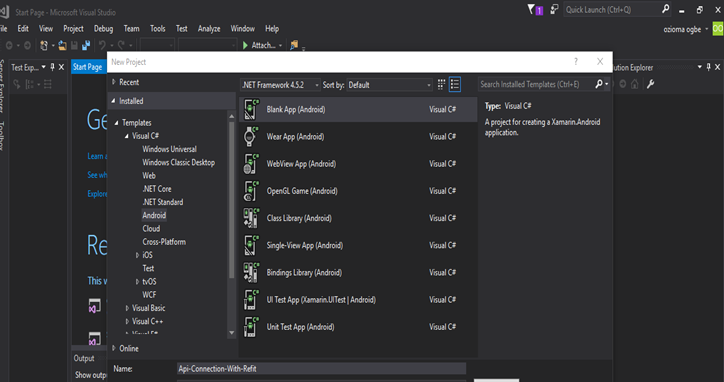
Start a new Xamarin.Android Project
2. Add reference to the REFIT Packages from Nugget
From the solution explorer, right click on reference then from the menu click on manage nugget packages, this would open up the nugget package manager window, then select the browse tab and search for refit. From the search result install the refit library by Paul Betts to the current project.
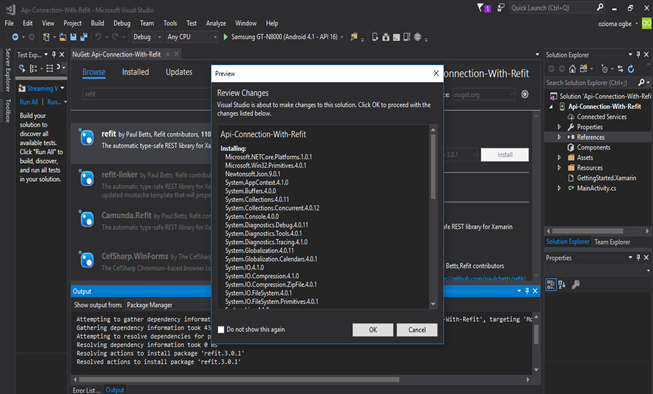
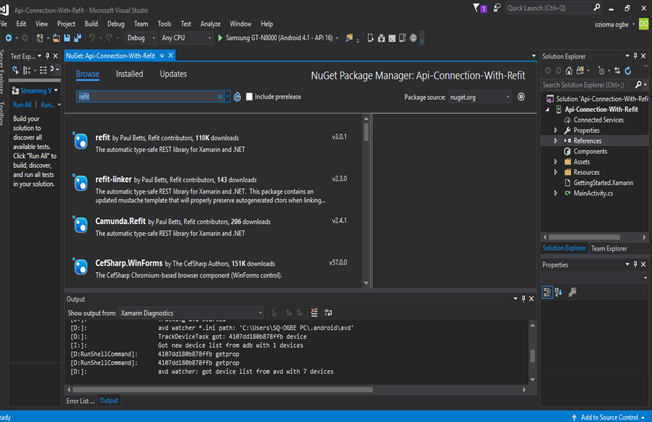
Installing this package would install both Refit dependency and other dependencies we would need to deserialize the JSON. So we are all set with what we need to build the app. Then we need to define the model of our response and user.
3. Define the Response model
We need a C# class to model our response we would be getting from the github api, but first of all let’s see what the response looks like in JSON. The URL that I need to list github developers in Lagos is
https://api.github.com/search/users?q=location:lagos
so that would give us our result in JSON, then we can use it to know what our response model would look like. I would make the request using postman, but you can use your web browser
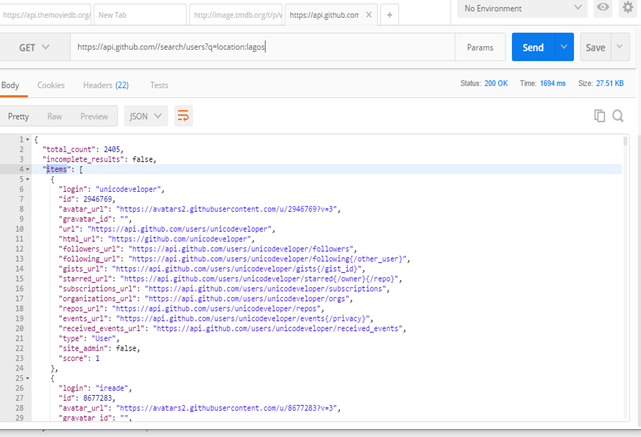
From the structure of the JSON response we can see that it contains the following
-
The total number of result (total_count).
-
A status to show if the result is complete or not(incomplete_result).
-
A JSON array (items) containing the result object ( this is what we are interested in) .
The result is paginated that means we can only get 30 items per request, to get more items, we would have to pass the page number as part of the request, but this 30 result would be enough to demonstrate our example.
So let’s model our response object.
From the solution Explorer, right click on the project and create a new folder called Model, this folder would contain our model for the response and the user.
Right click on the newly created Model folder and add a new class called ApiResponse
The code for the ApiResponse.cs class is shown below:
using Newtonsoft.Json;
using System.Collections.Generic;

namespace ConnecingToApiExample.Model {
  public class ApiResponse {
  [JsonProperty(PropertyName = "total_count")]
  public string totalCount { get; set; }

  [JsonProperty(PropertyName = "incomplete_results")]
  public string incompleteResults { get; set; }

  [JsonProperty(PropertyName = "items")]
  public List<User> items { get; set; }

  public override string ToString() {
  return totalCount;
   }
  }
}
The attribute JsonProperty(PropertyName = "foo_bar")
is used to define the JSON name of the property that would be used to set the C# properties,
this is used by Json.Net to deserialize the Json into a C# object.
We can see that the JSON property items which is a JSON array from the response we got from
the postman request would be automatically converted to a list of User
(we have not defined user yet) again this is done by Json.net .
So our ApiResponse.cs class is ready but it contains a list of User but what is a user, lets define a User.
4. Define the User model
To define the User model, right click on the Model folder and add a new Class called User.cs. To define the content of the user class we have to know which property of the user we need, so we go to the Json response and check the item node, since each item represents a User. We only need the login property since that is the username of the user and that is what we would display on the list view. So we define our user class as follows:
using Newtonsoft.Json;

namespace ConnecingToApiExample.Model {
 public class User {
 [JsonProperty(PropertyName = "login")]
 public string userName { get; set; }

 public override string ToString(){
   return userName;
   }
 }
}
The user class contains the login property and that would be used to populate the “username” C# property. We have also Overridden the ToString() method to return the user name so that it would be easily displayed on the form.
So we are done with the modelling of the Response and the user, what we do next is that we define the API Interface.
5. Define the API Interface
To use Refit, we define an interface that would hold signature of our endpoint methods and we rely on Refit to provide implementation of the interface using the parameters we provide.
To define the API interface, create a new folder called **Interface, **right click on the folder and add a new item, select interface and name it **IGitHubApi.cs. **The content of the API interface is shown below
using System.Threading.Tasks;
using Refit;
using ConnecingToApiExample.Model;

namespace ConnecingToApiExample.Interface {
  [Headers("User-Agent: :request:")]
  interface IGitHubApi {
  [Get("/search/users?q=location:lagos")]
  Task<ApiResponse> GetUser();
  }
}
First of all, we declared a Header User-Agent: :request
This tells the GitHub API that we are making a request.
Then we define the signature of the method we would use to get result from our API
[Get("/search/users?q=location:lagos")]
 Task<ApiResponse> GetUser();
The Get attribute shows that we are making a get request to the endpoint (/search/users”) with the query parameter (“q=location:lagos”)
But how does Refit know the base URL to append these endpoints and parameters to? We would come to that (Step 7).
The next piece of work would be done in our MainActivity class but before then lets design our user interface.
6. Design the User Interface
Our user interface would be very simple, it would contain just a Button and a List View, the button would be used to start the process of getting the list of users and the list view would display this list of users.
To design the user interface open main.xml and add the following source code
<?xml version="1.0" encoding="utf-8"?>
<LinearLayout xmlns:android="http://schemas.android.com/apk/res/android"
 android:orientation="vertical"
 android:layout_width="match_parent"
 android:layout_height="match_parent">
 <Button
 android:layout_width="match_parent"
 android:layout_height="wrap_content"
 android:text="List Users"
 android:id="@+id/bt_list_users" />
 <ListView
 android:layout_width="match_parent"
 android:layout_height="match_parent"
 android:id="@+id/listview_users"
 android:background="#000000" />
</LinearLayout>
This is how the UI should look in the main layout
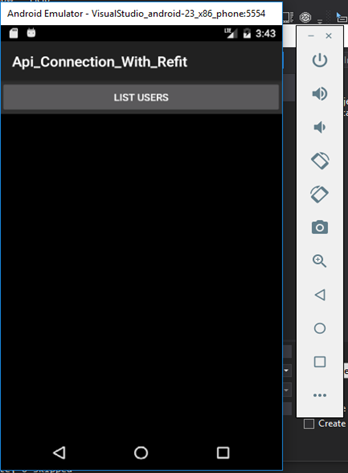
So now that the User Interface is set up lets go to the main part of the program that would start off the API call process.
First of all, let’s declare the global Refit settings.
7. Define Refit and Json.net Settings
Before we start calling the refit API, let’s set up the basic settings that would get Refit to work properly. We only need to define these settings once and they would serve us throughout the application. We could keep these settings in a Utility class and make a single call to initialize them but we would keep this example simple and define it in the Main Activity’s OnCreate() method, so that when the activity is created then this settings is initialised. The first thing we have to do is to define the JSON conversion settings and we can do that by adding the following code snippet to the onCreate() method of the MainActivity
// declare the global settings
JsonConvert.DefaultSettings =()=> new JsonSerializerSettings() {
  ContractResolver = new CamelCasePropertyNamesContractResolver(),
  Converters = { new StringEnumConverter() }
 };
And add the following reference for the code to function properly
**using Newtonsoft.Json.Serialization;
using Newtonsoft.Json.Converters;
using Newtonsoft.Json;
Then we define our global variables in the MainActivity as follows:
namespace ConnecingToApiExample{namespace ConnecingToApiExample {
 [Activity(Label = "ConnecingToApiExample", MainLauncher = true, Icon = "@drawable/icon")]
 public class MainActivity : Activity  {
     IGitHubApi gitHubApi;
     List<User> users = new List<User>();
     List<String> user_names = new List<String>();
     Button cake_lyf_button;
     IListAdapter ListAdapter;
     ListView listView;

 protected override void OnCreate(Bundle bundle)
 {
…Then lets tell Refit to give us an Implementation of the IGithubApi interface so that we can use it to make calls to the API, we do that by assigning that implementation to the variable gitHubApi.
In the OnCreate() method, let’s get an implementation of our interface and assigned it to the gitHubApi variable like this:
gitHubApi = RestService.For<IGitHubApi>(“https://api.github.com");
As you can see this is where you tell Refit about the base URL that we would append the parameters that we declared in step 5.
Next let’s get reference to our user interface elements:
First we get the reference to the main.xml, then to the button and then the ListView using the snippet below:
  base.OnCreate(bundle);
 SetContentView(Resource.Layout.Main);
 cake_lyf_button = FindViewById<Button>(Resource.Id.bt_list_users);
 listView = FindViewById<ListView>(Resource.Id.listview_users);
 cake_lyf_button.Click += Cake_lyf_butto_Click;…
8. Make the API Call
Let’s create a method that would make the API call and fill in the List of Users with the result, then convert the result to string and use the string to populate the list of user names. Then use that list of user names to populate the list view in the UI. The method that would do that is given below:
private async void getUsers(){
  try {
  ApiResponse response = await gitHubApi.GetUser();
  users = response.items;

 foreach (User user in users) {
  user_names.Add(user.ToString());
 }
  ListAdapter = new ArrayAdapter<String>(this, Android.Resource.Layout.SimpleListItem1, user_names);
  listView.Adapter = ListAdapter;
 }
 catch (Exception ex) {
  Toast.MakeText(this,ex.StackTrace, ToastLength.Long).Show();
  }
 }
This line
ApiResponse response = await gitHubApi.GetUser();
is responsible for making the API call, since the call to the API returns a Task of type ApiResponse, to get the object we have to await the Task and thus the method has to be an async method as you can see from the method signature.
This method is called when the button is clicked so we just call it in the button clicked event handler of the button as shown below:
  private void Cake_lyf_butto_Click(object sender, EventArgs e){
   getUsers();
 }
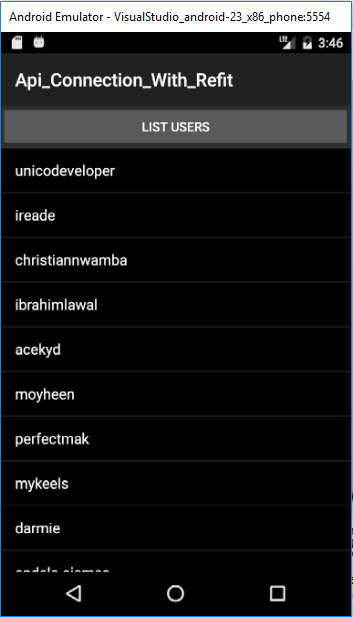
After you run the application and the button is clicked, this is the result.
Conclusion
Refit really makes making API calls easy and properly structured, you can explore more about the library by checking out their GitHub repo https://github.com/paulcbetts/refit
The complete source code form the different files are shown below in case you do understand the different snippets
MainActivity.cs
using Android.App;
using Android.OS;
using Android.Widget;
using Refit;
using ConnecingToApiExample.Interface;
using System.Collections.Generic;
using ConnecingToApiExample.Model;
using Android.Util;
using Newtonsoft.Json;
using Newtonsoft.Json.Serialization;
using Newtonsoft.Json.Converters;
using System;

namespace ConnecingToApiExample {
 [Activity(Label = "ConnecingToApiExample", MainLauncher = true, Icon = "@drawable/icon")]
  public class MainActivity : Activity {
   IGitHubApi gitHubApi;
   List<User> users = new List<User>();
   List<String> user_names = new List<String>();
   Button cake_lyf_button;
   IListAdapter ListAdapter;
   ListView listView;

 protected override void OnCreate(Bundle bundle) {
   try {
    base.OnCreate(bundle);
    SetContentView(Resource.Layout.Main);
    cake_lyf_button = FindViewById<Button>(Resource.Id.bt_list_users);
    listView = FindViewById<ListView>(Resource.Id.listview_users);
    cake_lyf_button.Click += Cake_lyf_butto_Click;
    JsonConvert.DefaultSettings =()=> new JsonSerializerSettings(){
    ContractResolver = new CamelCasePropertyNamesContractResolver(),
     Converters = { new StringEnumConverter() }
 };
 gitHubApi = RestService.For<IGitHubApi>("https://api.github.com"); }
 catch (Exception ex) {
   Log.Error("Ozioma See", ex.Message);
   }
 }
 private void Cake_lyf_butto_Click(object sender, EventArgs e) {
  getUsers();
 }
  private async void getUsers() {
  try {
   ApiResponse response = await gitHubApi.GetUser();
   users = response.items;
 foreach (User user in users) {
   user_names.Add(user.ToString());
 }
 ListAdapter = new ArrayAdapter<String>(this, Android.Resource.Layout.SimpleListItem1, user_names);
 listView.Adapter = ListAdapter;
 }
 catch (Exception ex){
    Toast.MakeText(this,ex.StackTrace, ToastLength.Long).Show();
    }
  }
 }
}
2. Main.axml
<?xml version="1.0" encoding="utf-8"?>
<LinearLayout xmlns:android="http://schemas.android.com/apk/res/android"
 android:orientation="vertical"
 android:layout_width="match_parent"
 android:layout_height="match_parent">
 <Button
 android:layout_width="match_parent"
 android:layout_height="wrap_content"
 android:text="List Users"
 android:id="@+id/bt_list_users" />
 <ListView
 android:layout_width="match_parent"
 android:layout_height="match_parent"
 android:id="@+id/listview_users"
 android:background="#000000" />
</LinearLayout>
3. ApiResponse.cs
using Newtonsoft.Json;
using System.Collections.Generic;

 namespace ConnecingToApiExample.Model {
  public class ApiResponse {
  [JsonProperty(PropertyName = "total_count")]
  public string totalCount { get; set; }

   [JsonProperty(PropertyName = "incomplete_results")]
   public string incompleteResults { get; set; }

   [JsonProperty(PropertyName = "items")]
   public List<User> items { get; set; }

   public override string ToString(){
   return totalCount;
    }
   }
 }
4. User.cs
using Newtonsoft.Json;

namespace ConnecingToApiExample.Model{
 public class User  {
    [JsonProperty(PropertyName = "login")]
    public string userName { get; set; }
    public override string ToString(){
      return userName;}
  }
}
5. IGitHubApi.cs
using System.Threading.Tasks;
using Refit;
using ConnecingToApiExample.Model;

namespace ConnecingToApiExample.Interface {
  [Headers("User-Agent: :request:")]
  interface IGitHubApi {
   [Get("/search/users?q=location:lagos")]
   Task<ApiResponse> GetUser();
  }
}
I have also added the source code of this tutorial in my git repository here: